24 November 2021

Colour INKsiration Challenge #112 - Stamped One Sheet Wonder


Hello crafty friends!  And thanks for popping in!

Welcome back for Colour INKspirations Challenge #112.  The photo for this challenge was picked by fellow Crew Member, Vicki Boucher and our Guest Designer for this challenge is the lovely Yvonne Spikmans - Van Bruggen.


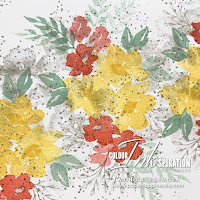
Things are a little hectic in my craft room at the moment, so for this challenge I thought I would grab the challenge colours and do some #simplestamping.  And it is definitely a challenge when you only have four colours but with a little bit of double stamping, first, second and third generation stamping those four colours can create a beautiful piece of cardstock that can be cut up and made into gift tags, cards, gift boxes or bags. It really is a very efficient way of creating if you need to make a batch of cards in a hurry.
 
My project uses five different stamp sets but that's it apart from the ink and cardstock.  My inspiration comes from Ruth Trice at Artful Stampin over on You Tube.  She is a Queen at this technique and I highly recommend you go and watch a few of her videos to see a real artist use this technique.


Supplies Needed:
  • Stamp Sets: Blossoms In Bloom, Hand-Penned Petals, Sparkle Of The Season, Forever Fern, Eden's Garden.
  • Cardstock:  Basic White
  • Inks:  Daffodil Delight, Poppy Parade, Mint Macaron, Gray Granite
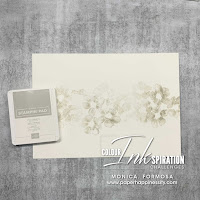
  • Stampin Pierce Mat
  • Clear Blocks
Steps to Stamping:
 
TIP:   Use a Stampin Pierce Mat under the cardstock when stamping with the photopolymer stamps. 
 
To begin, take the large floral image from Blossoms In Bloom and stamped across the centre of the cardstock to create background texture using third and even fourth generation stamping.
Stamp the large fill-in floral image from Hand-Penned Petals in clusters of three over the background stamping.
Using the next largest fill-in floral image from the same stamp set and stamp these in Poppy Parade close to the Daffodil Delight clusters alternating in double and single images.
Using the smallest single fill-in floral image, stamp this in second generation Poppy Parade once where there's two first generation flowers and twice where there's one. Add more if you feel there should be more.
Using first generation Mint Macaron, stamp the largest fill-in leaf image around the Daffodil Delight clusters.   TIP:  To create the illusion of the leaves coming from behind the flowers, don't ink up the full stamp so that you stamp nice and close.
Using (mainly) second generation stamping, take the fern image from the Sparkle Of The Season stamp set and stamp this image around the Poppy Parade flowers.  Again, don't ink up the step of the image or ink up only half if you want to squeeze it into a spot that doesn't have room for the full image.
Use Gray Granite to stamp one of the leafy images from Eden's Garden stamp set.
Use the smaller fill-in leaf image from Hand-Penned Petals and stamp the flower centres twice each time to create a darker centre.
Stamp second generation Gray Granite in the centres of the Poppy Parade flowers using  the single flower centre stamp from Blossoms In Bloom stamp set.
The last and most important step is to stamp 'dottage'.  This will hide any mistakes, break up the solid images and fill in any open areas.  Normally I would use the strongest colour for this, but don't like using any of the red or crimson colours as it can look a bit morbid.
Close up.    TIP:  Make rules as you stamp: stamp flowers in groups of three or more, add certain leaves in certain areas, other leaves in other areas, ALWAYS add dottage.


Full Page
 
 
Audition #1

 Audition #2
 
Audition #3
 
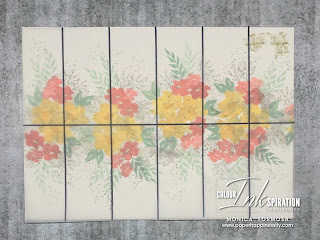
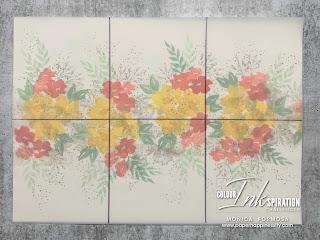
 I have created Vellum overlays that have been marked
with permanent marker to "audition" my stamping.
This will help me decide how I will cut it up. 
 
Audition #1:  Would be great as gift tags
 
Audition #2:  Either four or eight card toppers
 
Audition #3:  These could be trimmed further to create six card toppers for square cards
 
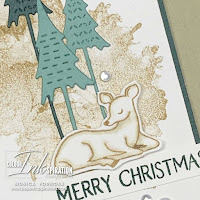
TIP:  Let your stamping be the show piece!  If using as card toppers, add a smallish sentiment, something that doesn't cover up that beautiful stamping you have just created.
 
TIP:  If a full sheet of cardstock scares you, cut it and only do half a sheet.  Or, cut it down even further.  And remember, cardstock has two sides, if you don't like it, turn it over and start again. 


Feel INKspired to join the challenge? I would love for you to join in our colour challenges. It's a great way to take yourself out of your comfort zone and use different colours! 

Firstly, get some INKspiration by checking out all of the creations of the Colour INKspiration Crew in the challenge album on our Facebook page. Then you have 12 days from today to make and upload your creation to the Facebook Colour INKspiration Group. You don't have to have a blog to participate but if you do you can link back to your post. Just a reminder to use all of the challenge colours. You can also use neutrals such as Whisper White, Very Vanilla, Crumb Cake, Sahara Sand and Basic Black as well as Metallics.

Not a member of the Colour INKspiration Facebook group yet? Just click here and ask to join Colour INKspiration, add the group to your favourites and share it with your crafty friends so they can join in the fun too. We can't wait to see what you create with these gorgeous colours.
  
Thank you so much taking the time to drop in. I hope I have inspired you and if you like what I have shown or if you have any questions, please leave them in the comments section below.  
 
Take care, stay safe and have a great day! 
 
Monica xx
.
 
To purchase any of the products I've used today  you can click any of the direct links in the Product List below or click the 'Shop Online' tab at the top of this page.  Both ways will get you directly to my online store, where you are only minutes away from getting products delivered straight to your door.

Or maybe you have a wish list as long as your arm? If so, the best deal in the catalogue is to join my Stamping Queens Stamping Team. Until the end of November, you'll get the $169.00 Starter Kit - filled with your pick of products to the value of $235.00 - for only $130.00 with a 20% discount every time you place an order!
 

                                                 .

  Product List 


10 November 2021

Peaceful Christmas - Colouring INKspiration Challenge #111


Hello crafty friends!  And thanks for popping in!

Welcome back for Colour INKspirations Challenge #111.  The photo for this challenge was picked by fellow Crew Member, Nicole Wilson and our Guest Designer for this challenge is the very talented Michele Miller.


 The card I'm sharing today is a little product heavy but you could easily omit one of the stamp sets and attempt your own watercoloured background.  Myself, I wanted to have a play and see if I could achieve a watercoloured-looking background using the Artistically Inked stamp set.  For those who like to be in control of their creative processes, using this stamp set is also a great option.

Supplies Needed:

  • Dies:  Christmas Trees Dies
  • Stamp Sets:  Peaceful Deer, Artistically Inked
  • Cardstock:  Crumb Cake, Very Vanilla, Evening Evergreen, Soft Succulent
  • Inks:  Crumb Cake, Evening Evergreen
  • Colour Accessories:  Stampin' Blends:  Crumb Cake Combo, Colour Lifter
  • Embellishments:  Subtle Shimmer Sequins
  • Tools:  Paper Trimmer, Mini Stampin' Cut & Emboss Machine, Scissors, Take Your Pick Tool, Foam Mat (for stamping with the photopolymer stamps)
  • Adhesives:  Mini Dimensionals, Dimensionals, Tombow Liquid Glue

 How To Assemble:

 
For this project you will need:
A card base in Crumb Cake cardstock
A piece of Very Vanilla cardstock for the inside
A mat of Evening Evergreen measuring 1 1/4" less on two side than the card front.
A piece of Very Vanilla measuring 1/8" less on two sides than the piece of Evening Evergreen cardstock.
Scraps of Very Vanilla (for the deer and sentiment), Soft Succulent and Evening Evergreen cardstock (for die cuts).

Grab the two watercolour images from Artistically Inked stamp set, create a backgound using Crumb Cake ink.


Stamp your sentiment in Evening Evergreen ink.

I've used 'Merry Christmas' from Peaceful Deer Stamp Set and I've stamped this on a strip of Very Vanilla cardstock measuring at least 2 1/2" x 3/8".

Stamp the deer in Crumb Cake ink using the Stampin' Pierce Mat for cushioning.

Colour the image with the Stampin' Blends alcohol markers.

I wanted only very subtle colouring.  I went around the outline and over any areas which would have shadows with the Colour Lifter then went over the top with the Light Crumb Cake Stampin' Blend.
 
I went over the Crumb Cake with the Colour Lifter pen again to blend the harsh lines created with the Crumb Cake.
 
Fussy cut the image.


Adhere the piece of Very Vanilla on top of the Evening Evergreen cardstock.
 
Adhere the three tree die cuts and attach the deer with Mini Dimensionals.


Glue this to the front of the card base. 

Trim the sentiment and adhere to the card front.

Add a few embellishments from the Subtle Shimmer Sequins using the putty end on the Take Your Pick tool to help with placement.


Stamp one of the solid tree images from Peaceful Deer in Evening Evergreen ink onto the large piece of Very Vanilla cardstock and glue this into the centre of the card.

Again use the Stampin' Pierce Mat for cushioning when stamping.


Feel INKspired to join the challenge? I would love for you to join in our colour challenges. It's a great way to take yourself out of your comfort zone and use different colours! 

Firstly, get some INKspiration by checking out all of the creations of the Colour INKspiration Crew in the challenge album on our Facebook page. Then you have 12 days from today to make and upload your creation to the Facebook Colour INKspiration Group. You don't have to have a blog to participate but if you do you can link back to your post. Just a reminder to use all of the challenge colours. You can also use neutrals such as Whisper White, Very Vanilla, Crumb Cake, Sahara Sand and Basic Black as well as Metallics.

Not a member of the Colour INKspiration Facebook group yet? Just click here and ask to join Colour INKspiration, add the group to your favourites and share it with your crafty friends so they can join in the fun too. We can't wait to see what you create with these gorgeous colours.
  
Thank you so much taking the time to drop in. I hope I have inspired you and if you like what I have shown or if you have any questions, please leave them in the comments section below.  
 
Take care, stay safe and have a great day! 
 
Monica xx
.
 
To purchase any of the products I've used today  you can click any of the direct links in the Product List below or click the 'Shop Online' tab at the top of this page.  Both ways will get you directly to my online store, where you are only minutes away from getting products delivered straight to your door.

Or maybe you have a wish list as long as your arm? If so, the best deal in the catalogue is to join my Stamping Queens Stamping Team. Until the end of November, you'll get the $169.00 Starter Kit - filled with your pick of products to the value of $235.00 - for only $130.00 with a 20% discount every time you place an order!
 

                                                 .

  Product List


 Live In Australia? Shop With Me!


Let's Use Vellum - Stampin' Around The World Video Hop

  Welcome and thanks for popping in! Our second Stampin' Around The World Video Hop has kicked off and this month we've been tas...