28 September 2022

Colour INKspiration Challenge #130 - Stamped Monogramme


Hello my friends and thanks for popping in!  Welcome back for another Colour INKspiration Challenge.  

We have been given the colours Highland Heather, Blackberry Bliss, Night Of Navy and Granny Apple Green and I have to say, I didn't mind working with them. The inspiration photo for this Challenge was chosen by Crew Member, Lou Kitzelman.


My project was inspired by a You Tube Video by Ruth Trice, demonstrating how to stamp a monogramme.  This would have been a little easier with more colours but I was up for the challenge and I am pleased with the results. Sometimes it's better not to have too many choices.


Supplies:
  • Stamp Sets (in order of use): True Beauty, Heavenly Hollyhocks, Hand-Penned Petals, Artistically Inked
  • Inks:  Highland Heather, Blackberry Bliss, Night Of Navy, Granny Apple Green
  • Cardstock: Basic White 12"x12" (or A4/Lettersize)
  • Other: Printed initial, 2B (or softer) graphite pencil, T-Ruler, eraser

Let's Make It:
  • Print the initial that you're wanting to stamp.
  • TIP 1:  The larger the better
  • TIP 2:  Print just the outline or you'll be replacing your ink cartridge in less than no time.
  • Because there's a good chance the letter you're using hasn't been printed in the centre of the page, you will need to find the centre of it by folding and creasing both horizontally and vertically, matching the outline of the letter with the opposite side.
  • Measure the piece of cardstock to determine the centre.  I used my Grid Paper and a T-Ruler to help.
  • Flip the page and on the reverse side, roughly scribble where the outline of the letter would be. Use a 2B or softer pencil.
  • Match up the fold-lines to the pencil marking on the cardstock and trace the letter onto the cardstock.  All these will be erased once stamping is finished.
  • Choose your stamps to fit within the lines.  The overall final image will need to have a well defined edge.  Start with the largest image first and progress down in size.  In my video, I probably should have stamped the larger leaves to highlight the largest flowers before stamping the larger Highland Heather flowers.
  • This technique is all about looking at the shape of your images and how they work within the shape of your letter.  Use curved shapes in the rounded areas and smaller images to fill-in spaces to create a well defined edge to the overall image.
  • Once finished, allow to sit for a few minutes to allow ink to completely dry then erase all the pencil marks.
  • Trim down if needed and add to a frame a for great gift idea.


The glass made photographing a little difficult


Visual tutorial showing the technique can be found here:   


Feel INKspired to join the challenge? I would love for you to join us! It's a great way to have fun with different colours! 

Firstly, hop on over and check out the creations of the Colour INKspiration Crew in the Challenge album on our Facebook page. Then you have 12 days from today to make and upload your creation to the Facebook Colour INKspiration Group. You don't have to have a blog to participate but if you do, you can link back to your post. Just a reminder to use all the challenge colours. Neutrals such as Whisper White, Very Vanilla, Crumb Cake, Sahara Sand and Basic Black are also allowed as well as Metallics. 

If you feel inspired, click here and ask to join Colour INKspiration, add the group to your Favourites and share it with your crafty friends so they can join in the fun too. We can't wait to see what you create with these gorgeous colours! 

Thank you so much taking the time to drop in. I hope I have inspired you and if you like what I have shown or if you have any questions, please leave them in the comments section below.   

Until next time, take care, stay safe and have a great day!  

Monica xx

.


To purchase any of the products I've used today, you can click any of the direct links in the Product List below or click the 'Shop Online' tab at the top of this page.  Both ways will get you directly to my online store, where you are only minutes away from getting products delivered straight to your door.


Or maybe you have a wish list as long as your arm? If so, the best deal in the catalogue is to join my Stamping Queens Stamping Team. Fill your Starter Kit with your choice of products to the value of $235.00 for only $169.00 with a 20% discount every time you place an order! No risk attached!


 .

Product List


.


14 September 2022

Stamped One Sheet Wonder - Colour INKspiration Challenge #129


Hello my crafty friends!  Welcome and thanks for popping in!

It's time for another Colour INKspiration Challenge and for this one, we have been asked to create a project with the colours Mango Melody, Starry Sky, Basic Grey and Silver.  Our inpsiration photo was chosen by myself and our Guest Designer for this challenge is the lovely Rebecca Nutley.  Can't wait to see what Bec has created for us.


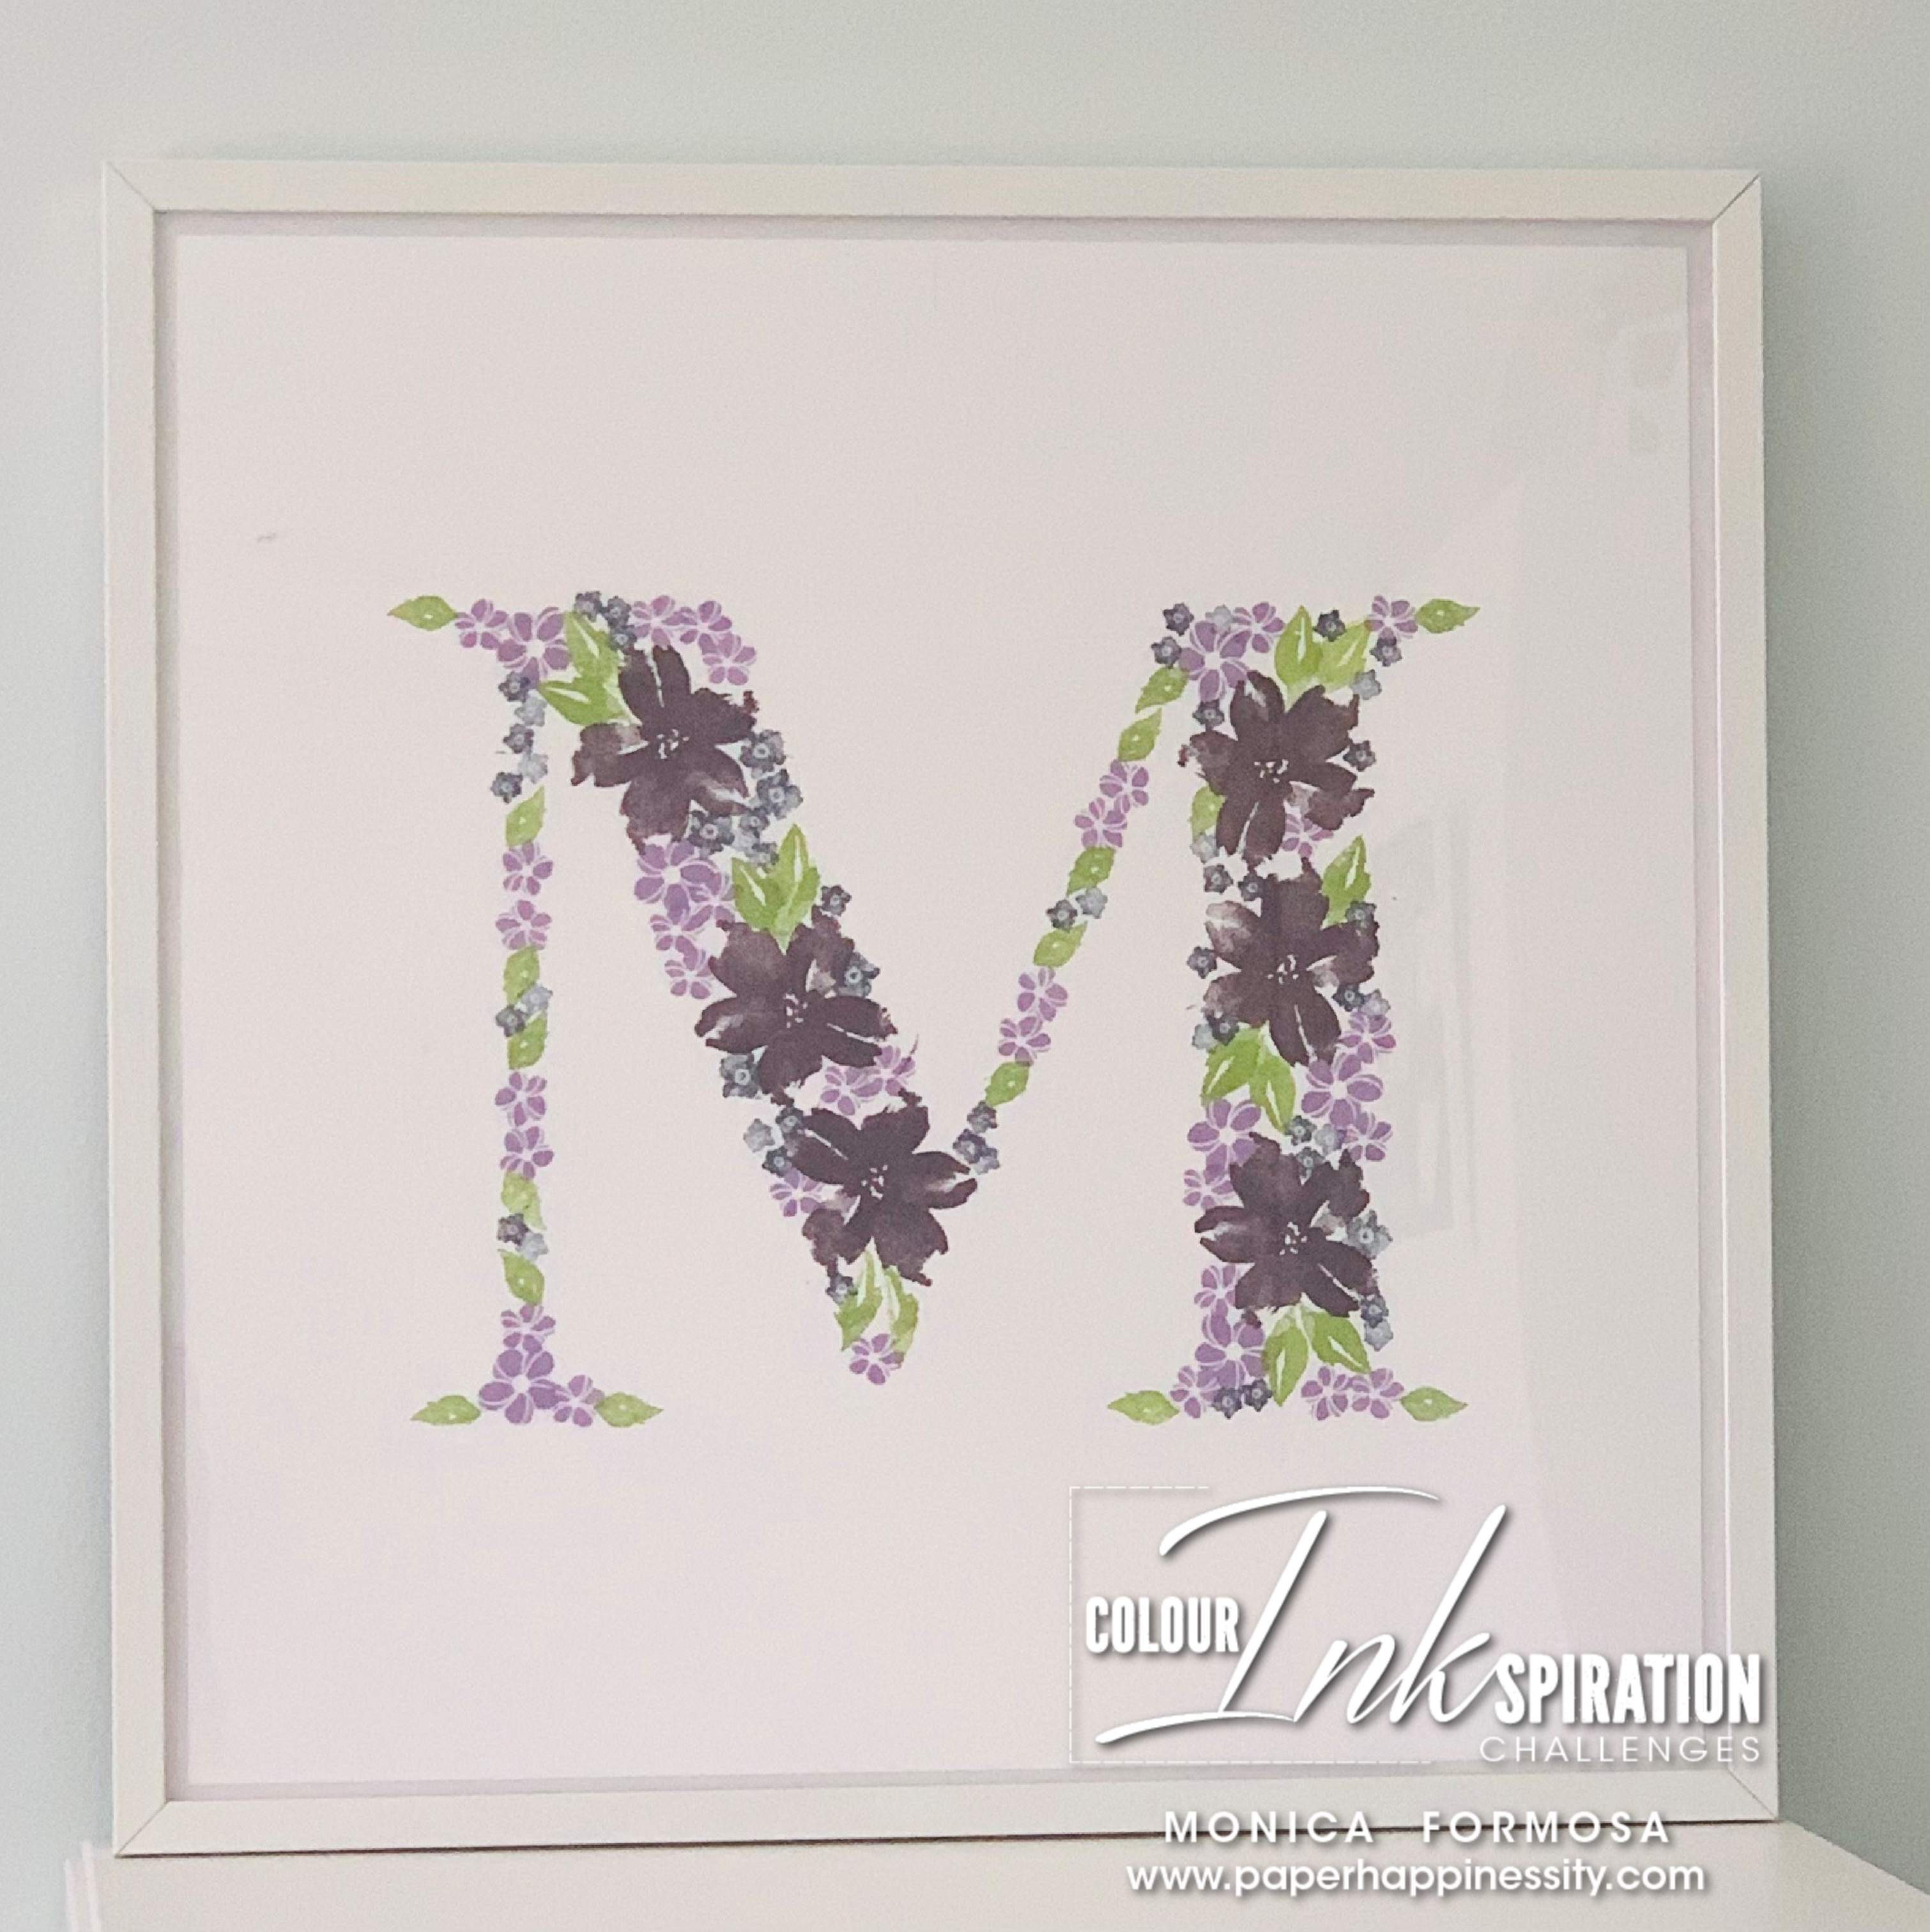
For this Colour Challenge I decided to stamp a sheet of Basic White cardstock in what we, over in the Artful Stampin community call, a stamped-one-sheet-wonder.  This is a great technique for when you need to make a heap of cards as all that's needed is a greeting on the front.  Of course, you can step it up but don't go too far as your stamping is what is on show here.  


Just a word of warning:  This technique does use a lot of stamp sets - you need various flower images in differents sizes and the same goes for foliage.  Therefore this way of creating is quite product heavy.  And usually I'd prefer to use more than just four colours but I loved the challenge of limiting myself and I was able to use first and second and sometimes third generation stamping to achieve different tones.

Supplies:
  • Stamp Sets (in order of use):  Blessings Home (background), True Beauty (main floral image) , Colour & Contour (detailed foral image), Forever Fern (foliage), Simply Fabulous (foliage), Framed Occasions (foliage), Lovely You (floral image), Heavenly Hollycocks (floral image), Quiet Meadow (background)
  • Cardstock:  Basic White
  • Inks:  Basic Gray (foliage and background), Starry Sky (florals), Mango Melody (background and florals), Versamark
  • Colouring Accessories:  Metallics Embosing Powders (silver) 
  • Tools:  Clear Blocks, Heat Tool
Let's Stamp:
  • Ideally, for this technique you will need a selection of different floral images in at least three sizes, a selection of foliage images again in at least three images, maybe a, what I call, an architectural image ie a branch or stick for different texture and definitely a dottage stamp. Don't be afraid to mix and match your stamp sets, that's what makes it fun.
  • To make it easier, I drew in pencil lines on the Basic White cardstock.
  • Using the large floral image in Blessing of Home, stamp third generation Mango Melody following the pencil lines. The purpose of this is to lay down some background texture that you may or may not see.
  • Stamp the five-petalled floral image from True Beauty Stamp Set in Mango Melody in groups of three where the lines intersect and at the edges of the page.  Go over the top of these again with Mango Melody using the outline floral image from Colour & Contour.
  • From this point, we need to fill in the areas between the flowers using the lines as a guide.  I would usually stamp in the lightest colour but in this instance I used both second and third generation  Basic Gray around the edges of the flowers. I've used one of the larger foliage images from Forever Fern leaving the stem of the image ink-free.  By using second and third generation stamping you are adding depth to your finished work.
  • Stamp the 'fluffy' foliage image from Framed Occasions again in Smoky Slate.  Place these images beside the other image from  Forever Fern. Don't be afraid of not inking up the whole stamp to make it fit and don't be afraid of  stamping over the top of the other images.
  • Next step is to add more foliage around the flowers.  I've used the little trio of leaves image from Simply Fabulous.  This is a great little stamp as it has no stem and I love the illusion of movement this image has. Again stamp both first and second generation.
  • Now it's time to add in some Starry Sky and for this I've used two images  The first is a floral image from Lovely You and this is stamped in the spaces between the flowers and leaves, stamping the image in first, second and sometimes third generation. The aim here is to fill in any gaps and any areas where there may be a stem ending in mid-air.  The second image from Heavenly Hollyhocks is also used for the same reason but also to add the stronger colour through the whole page so that your eye isn't drawn to just one area but over the whole sheet.
  • At this stage, I realised there needed to be more Mango Melody as my eyes were drawn to the large floral groups, so I've used the same stamp from Heavenly Hollyhocks and stamped this image more to the edges of my stamping.
  • The most important step comes next and that is adding dottage.  Choose the colour that your eye is mostly drawn to which is usually the darkest - except if its red/pink/purple tones as this will often look like you've had an unfortunate accident if you get my drift. For this stamping, I went with Basic Gray to soften all that other gray that has been stamped.  Use first and second generation stamping and fill in any gaps, cover any boo boos and this will soften any harsh lines. Using this same stamp, stamp Versamark and heat emboss in silver to add highlights.
  • To add a bit more interest and texture, I then went and stamped the distressed print image from Quiet Meadow Stamp Set across the edges of my lines of stamping in Smoky Slate ink in third and fourth generation ink.  I wanted this to fill in the white space but in a subtle way.  You could also use a mask/stencil.


I have been able to make eight cards from the sheet.  I trimmed it down so that I had four pieces measuring 2 3/4" x 5 1/2" which have been made into standard cards and four pieces measuring 2 3/4" x 2 3/4" which have been made into four 4" x 4" cards.  I haven't added a sentiment on any of them at this point as I will add them as I need to use them.

I keep these card simple because the stamping is the star of this show! 


Watch  me recreate it on You Tube: https://youtu.be/1pkGvkW9Vn4


Feel INKspired to join the challenge? I would love for you to join us! It's a great way to have fun with different colours! 

Firstly, hop on over and check out the creations of the Colour INKspiration Crew in the Challenge album on our Facebook page. Then you have 12 days from today to make and upload your creation to the Facebook Colour INKspiration Group. You don't have to have a blog to participate but if you do, you can link back to your post. Just a reminder to use all the challenge colours. Neutrals such as Whisper White, Very Vanilla, Crumb Cake, Sahara Sand and Basic Black are also allowed as well as Metallics. 

If you feel inspired, click here and ask to join Colour INKspiration, add the group to your Favourites and share it with your crafty friends so they can join in the fun too. We can't wait to see what you create with these gorgeous colours! 

Thank you so much taking the time to drop in. I hope I have inspired you and if you like what I have shown or if you have any questions, please leave them in the comments section below.   

Until next time, take care, stay safe and have a great day!  

Monica xx

.


To purchase any of the products I've used today, you can click any of the direct links in the Product List below or click the 'Shop Online' tab at the top of this page.  Both ways will get you directly to my online store, where you are only minutes away from getting products delivered straight to your door.


Or maybe you have a wish list as long as your arm? If so, the best deal in the catalogue is to join my Stamping Queens Stamping Team. Fill your Starter Kit with your choice of products to the value of $235.00 for only $169.00 with a 20% discount every time you place an order! No risk attached!


 .
Product List


.


03 September 2022

Bron's 60th Birthday Blog Hop - Tropical Holiday


Hello there crafty friends!  Welcome and thanks for stopping by!

Today is the last of six Blog Hops that my lovely friend, Bronwyn has put together for her 60th Birthday. I I've had an amazing time and gathered lots of inspiration from those who have participated.  The theme for this Blog Hop is Tropical Holiday as Bron is enjoying the tropical sun of far North Queensland as we speak.

My card features the Season of Chic Bundle and I've created a background using torn cardstock and vellum.  By adding a few seashells and some 'bubbles', my scene is set. 


Supplies:
  • Bundle:  Season of Chic
  • Cardstock:  Crumb Cake, Tahitian Tide, Balmy Blue, Vellum
  • Inks:  Blushing Bride, Flirty Flamingo, Balmy Blue, Tahitian Tide, Versamark
  • Colouring Accessories:  Basics Embossing Powers (white)
  • Embellishments:  Effervescent Elements
  • Adhesives:   Fine Tip Glue Pen, Tombow Liquid Glue,  Mini Glue Dots
  • Tools:  Blending Brushes, Paper Trimmer, Mini Stampin' Cut & Emboss Machine, Heat Tool. Bone Folder
Let's Make It:
  • Create a card base in Crumb Cake cs.  Stamp the sentiment in the bottom right corner with VersaMark ink and heat emboss with white powder.
  • Tear a piece of Vellum, Balmy Blue and Tahitian Tide cs to fit the card front diagonally, stepping each piece to create the illusion of water.   
  • Gently blend co-ordinating ink to the torn edges of each of the blue cardstocks.  Glue the top and side down of each leaving the torn edge open.
  • Stamp two shells in Blushing Bride and the third in Flirty Flamingo and die-cut using the co-ordinating die.  Run each shell over a Bone Folder to create a low dome.  
  • Attach the shells using a Dimensional in the centre and a Glue Dot under the top and bottom edges. This will maintain the rounded shape.
  • Apply some glue from the Fine Tip Glue Pen along the edge of the Vellum and sprinkle some Effervescent Elements over the line of glue.  Allow to dry.


There is quite a esteemed list of lovely papercrafters on this Hop and I can't wait to go and check out everyone else's projects.  I invite you to continue on with our Blog Hop and be inspired by what everyone has created. 

Monica Formosa (you are here)

NEXT in line is the fabulous Lou Kitzelman and I'm looking forward to seeing what she has created. Apart from this Blog Hop, there is also a Instagram Hop starting with Bron at @addinktivedesigns. Go check it out  - there is more creativity to inspire.


Thanks again for taking the time to drop in. I hope I have inspired you and if you like what I have shown or if you have any questions, please leave them in the comments section below.  
 
Until next time, take care, stay safe and have a great day!   
Monica xx
.
 
To purchase any of the products I've used today  you can click any of the direct links in the Product List below or click the 'Shop Online' tab at the top of this page.  Both ways will get you directly to my online store, where you are only minutes away from getting products delivered straight to your door.

Or maybe you have a wish list as long as your arm? If so, the best deal in the catalogue is to join my Stamping Queens Stamping Team. Purchase your Starter Kit for $269-00 and add products of your choice up to the value of $235.00 with an ongoing 'shoppers discount' every time you order! There's absolutely no pressure to make it a 'business' and no penalty if you don't want to remain a Demonstrator - you get to keep the all the products you've ordered.
 

 .


 .


  .


Shabby Chic Florals - Colour INKspiration Challenge #162

Hello and welcome and a big thanks for popping in!   Colour INKspiration Challenge #162 has kicked off over on Facebook and today I'm sh...