22 February 2023

Watercolour Birthday Wishes for Colour INKspiration Challenge #138


Hello my crafty friends!  Welcome and thanks for stopping by!

Today I've got a card for you which I created for Colour INKspiration Challenge #138.  Our inspiration picture was chosen by myself and comes from a collection of photos taken by @tim_wildlife on Instagram.  The colours are  Daffodil Delight, Granny Apply Green, Tahitian Tide and Highland.  Our Guest Designer for this Challenge is the wonderful Jolanda Johnstone and  I can't wait to go and see what everyone has created.


instagram.com/tim_wildlife/


My card features a little watercolouring to achieve the variegated colours in the foliage and flowers which is then die-cut using the Flowers of Home Dies.  The background has a little ink blending over white heat-embossed stamping.  To finish off the card, I added a few gems from the Glossy Dots Assortment.


Supplies:

  • Dies:  Flowers of Home
  • Stamp Sets:  Quiet Meadow, One Happy Family
  • Cardstock:  Basic White Thick (card base) Basic White, Daffodil Delight,  Fluid 100 Watercolour Paper
  • Paper:  2022-2024 In-Colour 6"x 6"Designer Series Paper
  • Inks:  Highland Heather, Granny Apple Green, VersaMark
  • Accessories: Basic Embossing Powders (white)
  • Embellishments:  Glossy Dots Assortment
  • Tools:  Heat Tool, Blending Brushes, Paper Trimmer, Mini Cut & Emboss Machine, 
  • Adhesives:  Tombow Liquid Glue, Dimensionals, Glue Dots.
Let's Make It:
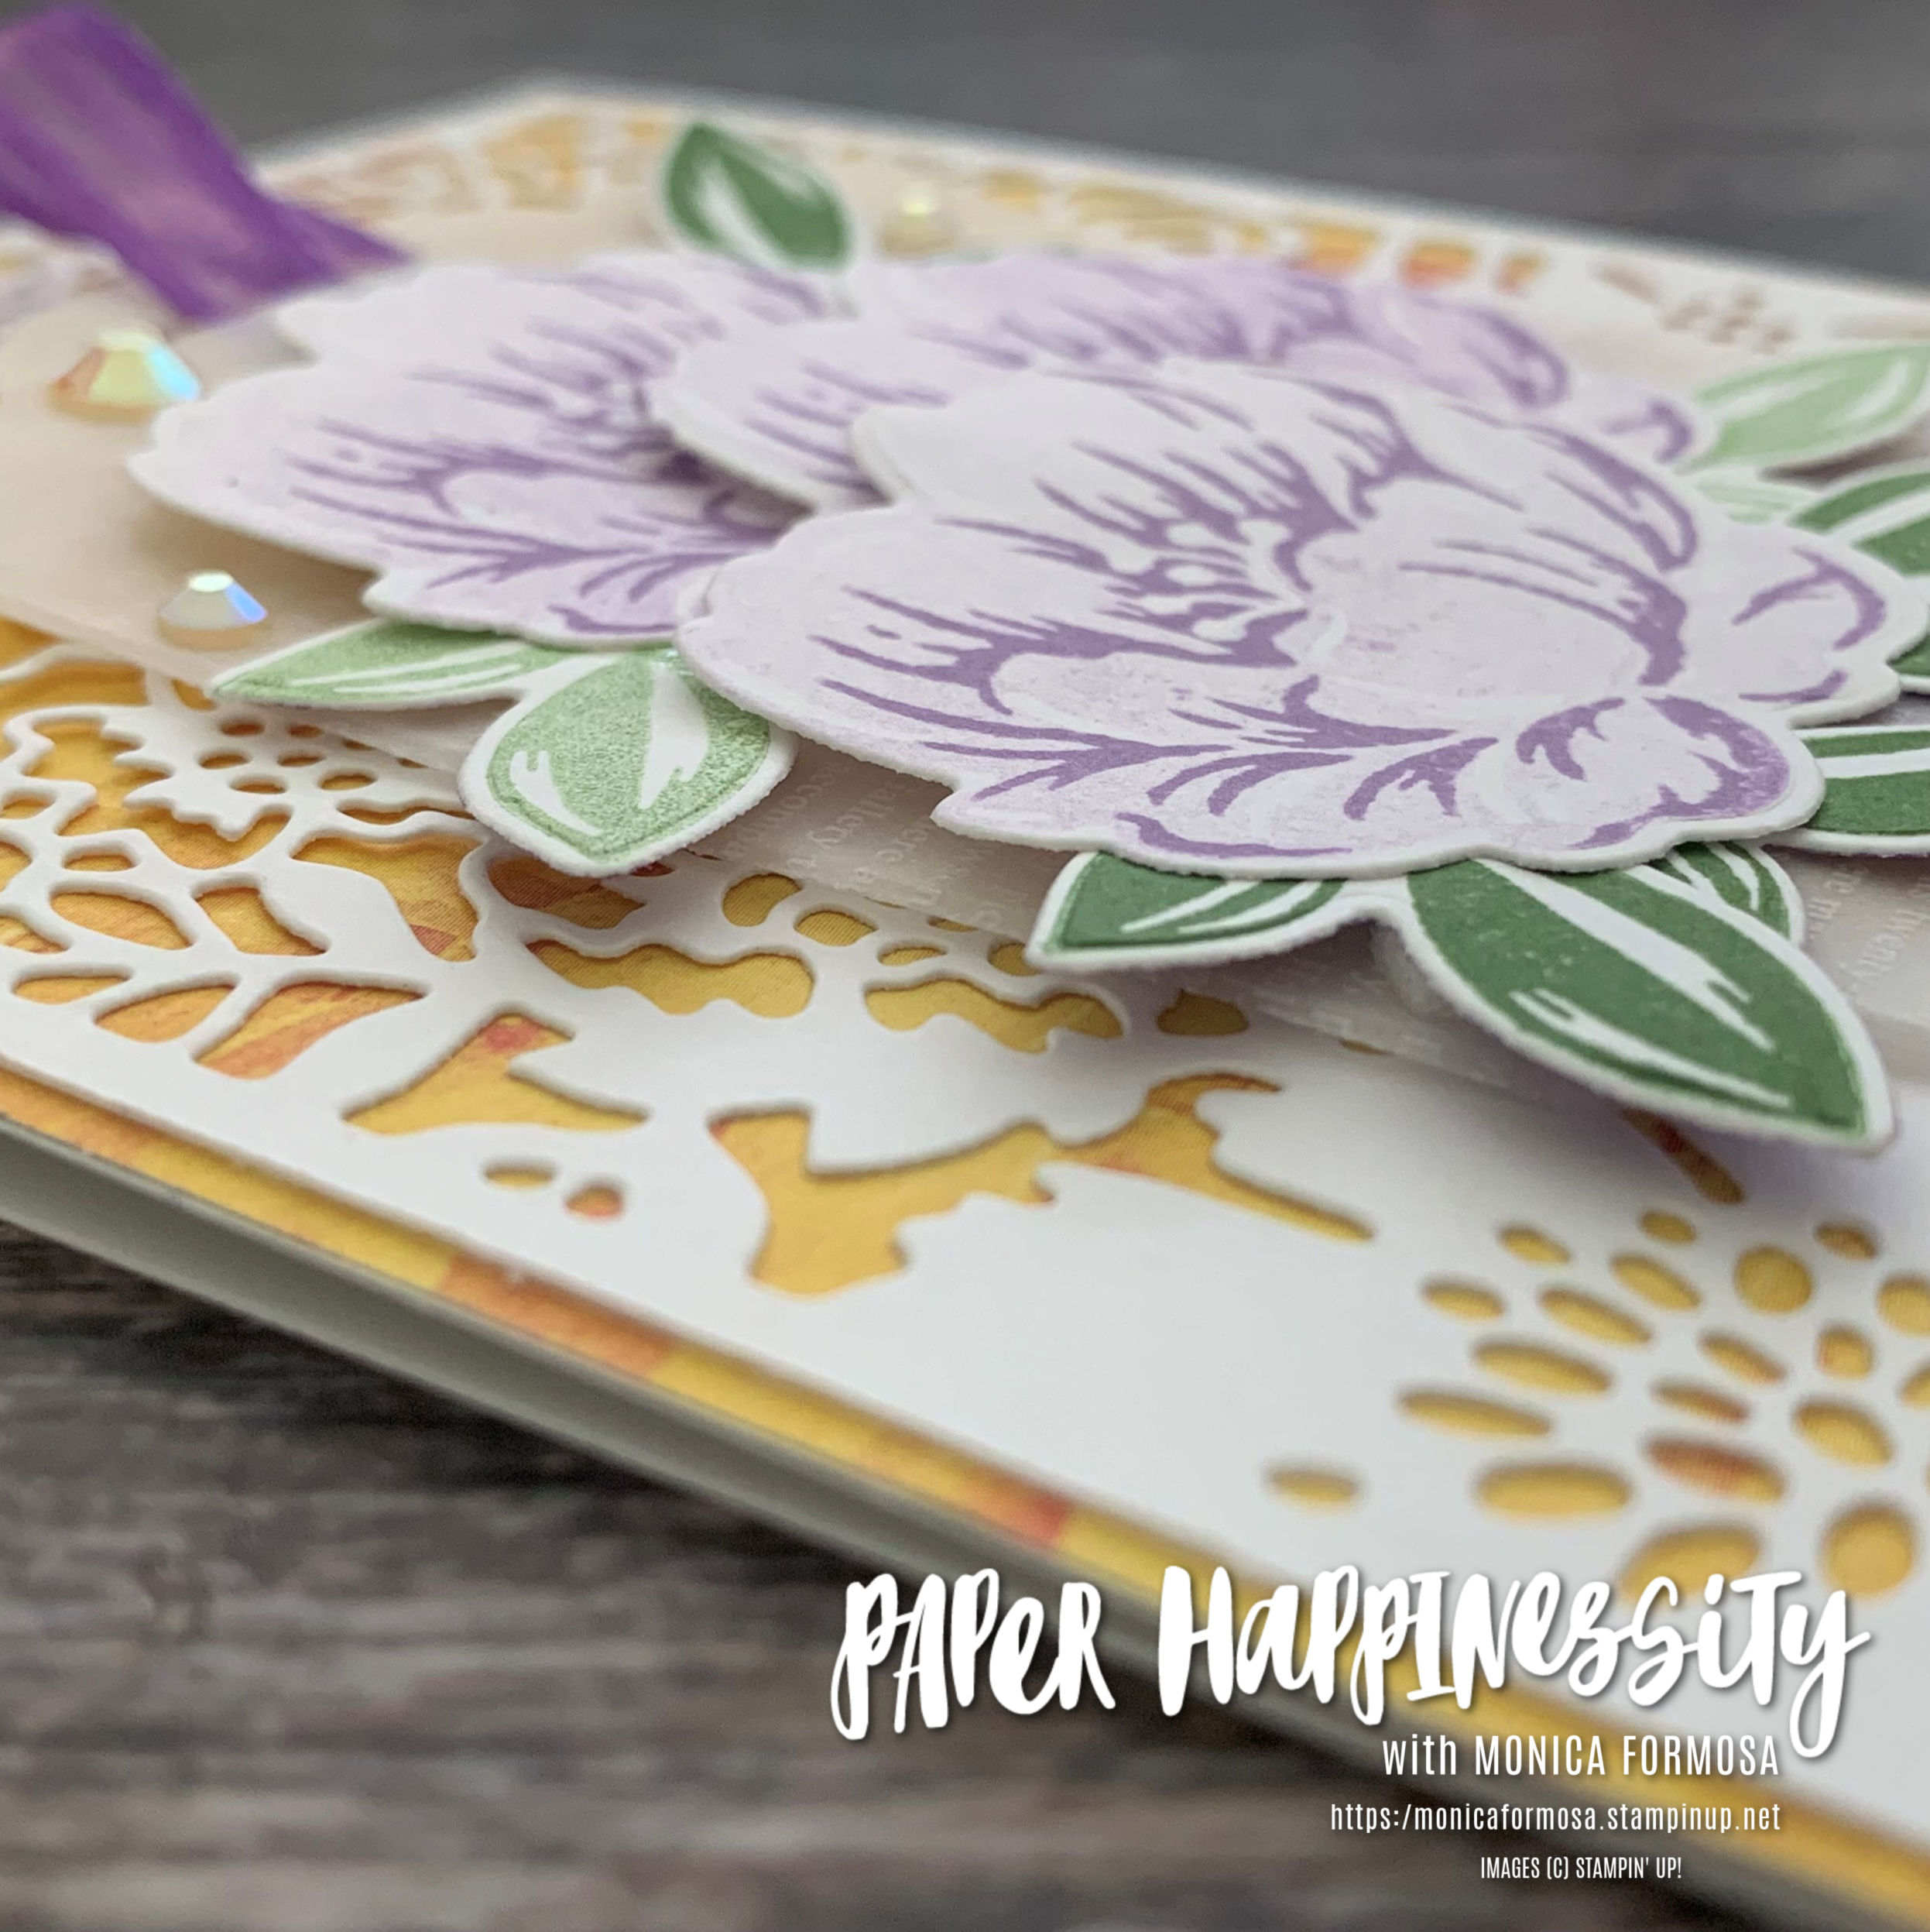
  • Watercolour a sheet each (if you're frugal, you'll only need half a sheet) using Granny Apply Green ink and Highland Heather ink and die cut the pieces using the green for foliage and the mauve for flowers.

  • On a piece of Basic White cardstock that is 1/2" (approx 1cm) smaller on two sides than the card front, stamp the distressed font image from Quiet Meadow across the lower section and heat emboss in white.  Very gently blend Granny Apple Green ink over the top extending past the image top and bottom. Take a  tissue or clean, soft cloth and gently rub over the top to remove the ink on the embossing.

  • Trim a piece of Tahitian Tide paper to measure slightly larger that this piece of Basic White cardstock and also a piece of Daffodil Delight cardstock so that it's slighter larger again but still smaller than the card front.  Glue all three together, off-setting to create peek-a-boo colour under each layer. Glue this to the card front.
  • Create a wreath with the die-cut foliage and add the flowers using Glue Dots to secure. TIP:  Trace around a circular shape to help you with placement.
  • Stamp a greeting on a strip of Basic White cardstock and attached to the card front with Dimensionals.
  • Trim a second piece of Basic White cardstock smaller than the card front.  Stamp the same distressed type image in the bottom right corner and heat emboss in white.  Gently blend Granny Apply Green ink over the top and remove the excess ink with a tissue or soft clean cloth.  
  • Glue a strip of Daffodil Delight cardstock and Tahitian Tide paper to the bottom edge and trim the top edge to fit inside the card. 

  • Secure this to the inside of the card using Tombow Liquid Glue.
  • To finish the card, add a few of the blue Glossy Dots to the front to pull the colour in from the edges.


Video tutorial can be seen here:          https://youtube.com/live/muYwvv17Opg


Feel INKspired to join the challenge? I would love for you to join us! It's a great way to have fun with different colours! 

Firstly, hop on over and check out the creations of the Colour INKspiration Crew in the Challenge album on our Facebook page. Then you have 12 days from today to make and upload your creation to the Facebook Colour INKspiration Group. You don't have to have a blog to participate but if you do, you can link back to your post. Just a reminder to use all the challenge colours. Neutrals such as Whisper White, Very Vanilla, Crumb Cake, Sahara Sand and Basic Black are also allowed as well as Metallics. 

If you feel inspired, click here and ask to join Colour INKspiration, add the group to your Favourites and share it with your crafty friends so they can join in the fun too. We can't wait to see what you create with these gorgeous colours! 

Thank you so much taking the time to drop in. I hope I have inspired you and if you like what I have shown or if you have any questions, please leave them in the comments section below.   

Until next time, take care, stay safe and have a great day!  

Monica xx

.

To purchase any of the products I've used today, you can click any of the thumbnail links in the Product List below or click the 'Shop Online' tab at the top of this page.  Both ways will get you directly to my Online Store, where you are only minutes away from getting products delivered straight to your door.

Or maybe you have a wish list as long as your arm? If so, the best deal in the catalogue is to join my Stamping Queens Stamping Team. 

During the months of January and February there are three great joining options:

1.  Grab the exclusive Boho Blue Mini Machine (valued at $110.00 AUD) + your choice of $315.00 AUD of Stampin' Up! products for only $210.00 AUD.

2.  Grab the original white Mini Machine (valued at $110.00 AUD) + your choice of $315.00 AUD of Stampin' Up! products for $210.00 AUD

3.  Your choice of $315.00 AUD of Stampin Up products for only $169.00 AUD.

That's an extra $80.00 AUD more product than the standard Starter Kit plus a 20% discount every time you place an order! No conditions attached!


JOIN MY TEAM


.


18 February 2023

Playing with Hello, Irresistible Product Suite


Hello my crafty friends  Welcome and thanks for popping in!

These beautiful products have arrived on my craft desk and I must say, I'm smitten.  I just love the soft and subtle designs of the papers and the stamp set and co-ordinating dies will have so many different applications.  These will be available to purchase as part of Stampin' Up!s Online Exclusives coming on 1 March 2023.


The card I'm sharing with you today was created for my You Tube Live and was inspired by Jan Brown from JanB Cards.  You can see her Blog Post here:   https://janbcards.com/2021/10/free-standing-miura-card-video.html .  I've tweaked her measurements a little for my own OCD but it's basically the same. 

The fold is a Miura Fold and is a great one to show case these gorgeous papers.  I've used Flirty Flamingo as my card base and added a Basic White panel in the centre to write my message to the recipient.  I just love the peek-a-boo stand at the back which allows the card to stand free - the downside is you need a second piece of cardstock but it's so worth it, in my opinion.


SUPPLES:
  • Hello, Irresistible Product Suite
  • Dies:  Something Fancy
  • Cardstock:  Flirty Flamingo, Basic White
  • Ink:  Versamark
  • Accessories:  Basic Embossing Powders (white)
  • Embellishments:  Linen Thread
  • Tools:  Paper Trimmer, Take Your Pick Tool w stylus end, Stampin' Cut & Emboss Machine, Bone Folder, Silicone Mat, Ruler
LET'S MAKE IT:

Cardstock Base:  11 ¼” x 5 ¾”    Score at 3 ¾” and 7 ½”

  • Measure down 2” from the top on the LH score line and mark with a pencil. 
  • Use a ruler and a stylus and score a diagonal line from the top LH corner to the mark on the score line and from the mark on the LH score line to the top of the RH score line.
  • Measure up 2” from the bottom of the RH score line and mark with a pencil.
  • Use a ruler and a stylus and score a diagonal line from the bottom RH corner to the mark on the RH score line and from the mark on the RH score line to the bottom of the LH score line.
  • Erase the pencil marks. 
DSP – Front and Back Panels:   2 x 3 ½” x 5 ½”

  • Front Panel:  Measure down 1 7/8” from top RH corner , mark and trim diagonally to opposite LH corner.
  • Trim 1/8” off both straight edges.
  • Back Panel:  Measure up 1 7/8” from bottom LH corner, mark and trim diagonally to opposite RH corner
  • Trim 1/8” off both straight edges.

DSP – Inside Triangles:  3 ¼” x 1 ¾”

  • trim diagonally from bottom LH corner to top RH corner

Middle (DSP or cardstock):   3 ½” x 5 3/8”  

  • Measure down 1 7/8” from top LH corner, mark and trim diagonally to opposite top RH corner then measure up 1 7/8” from bottom RH corner, mark and trim diagonally to opposite bottom LH corner

For Peek-A-Boo stand:  

  • Cardstock 7 ½” x 5 ¾” and score at 3 ¾” 
  • Measure 2 1/8” down from top LH corner, mark and trim diagonally up to score-line.
  • DSP:  2 x 3 ½” x 3” .  Attach these to the bottom edge each side of the score line.

Belly Band:

  •    Cardstock 1” x 9” : Fold loosely around cardand decorate as desired.

You Tube video tutorial can be seen here: https://youtube.com/live/91WiRV1kLt0


Thank you so much taking the time to drop in. I hope I have inspired you and if you like what I have shown or if you have any questions, please leave them in the comments section below.   

Until next time, take care, stay safe and have a great day!  

Monica xx

.

To purchase any of the products I've used today, you can click any of the thumbnail links in the Product List below or click the 'Shop Online' tab at the top of this page.  Both ways will get you directly to my Online Store, where you are only minutes away from getting products delivered straight to your door.

Or maybe you have a wish list as long as your arm? If so, the best deal in the catalogue is to join my Stamping Queens Stamping Team. 

During the months of January and February there are three great joining options:

1.  Grab the exclusive Boho Blue Mini Machine (valued at $110.00 AUD) + your choice of $315.00 AUD of Stampin' Up! products for only $210.00 AUD.

2.  Grab the original white Mini Machine (valued at $110.00 AUD) + your choice of $315.00 AUD of Stampin' Up! products for $210.00 AUD

3.  Your choice of $315.00 AUD of Stampin Up products for only $169.00 AUD.

That's an extra $80.00 AUD more product than the standard Starter Kit plus a 20% discount every time you place an order! No conditions attached!


JOIN MY TEAM


.


17 February 2023

SU! Colour Challenge featuring Two Tone Flora Bundle


Hello and welcome crafty friends!  

I finally got around to creating a card for the SU! Colour Challenge over on Facebook.  Time seems to be of the essence at the moment or I need to stick more strictly to my to-do list, haha!

The colours for this February's Challenge is Daffodil Delight, Garden Green and Highland Heather which is a lovely, soft colour palette.


My card features the Two Tone  Flora Bundle which has a floral based stamp set and co-ordinating Dies to cut the stamped images as well as this beautiful background die which I've used. I've teamed these products with the Designer Tag Dies and the paper behind that big, beautiful background die has come from the Fancy Flora papers which is available in the current January - April 2024 Mini Catalogue.

The floral images were stamped in Highland Heather ink using first generation for the details and second generation for the solid image.  I used first and second generation stamping for the leaves to add a little depth. 

Layering Designs Vellum was used for the tag under the flowers to soften the busy-ness of the background.  I didn't have any Highland Heather ribbon in my stash, so I coloured the Fresh Freesia Open Weave Ribbon with Dark Highland Heather Blend Pen (did you know this could be done?) and tucked this through the top and bottom opening if the tag. 

For added dimension, I decided to glue the base of each flower directly to the tag and place a couple of foam Dimensionals to the tops and did the same for each set of leaves.  The tag was then attached to the card front using foam Dimensionals.


Supplies:
  • Bundle:  Two Tone Flora
  • Dies:  Designer Tags
  • Papers:  Fancy Flora, Layering Designs Vellum
  • Cardstock:  Basic White Thick (card base) Basic White (stamping and background die)
  • Inks:  Highland Heather, Garden Green
  • Accessories:  Highland Heather (Dark) Blend Pen
  • Ribbon:  Fresh Freesia Open Weave Ribbon (coloured)
  • Iridescent Pastel Gems (gold)
  • Tools:  Paper Trimmer, Stampin' Cut & Emboss Machine, Take Your Pick Tool with Brush with Die Brush Tool
  • Adhesives:  Tombow Multipurpose Glue, Dimensionals

Thank you so much taking the time to drop in. I hope I have inspired you and if you like what I have shown or if you have any questions, please leave them in the comments section below.   

Until next time, take care, stay safe and have a great day!  

Monica xx

.


To purchase any of the products I've used today, you can click any of the thumbnail links in the Product List below or click the 'Shop Online' tab at the top of this page.  Both ways will get you directly to my Online Store, where you are only minutes away from getting products delivered straight to your door.

Or maybe you have a wish list as long as your arm? If so, the best deal in the catalogue is to join my Stamping Queens Stamping Team. 

During the months of January and February there are three great joining options:

1.  Grab the exclusive Boho Blue Mini Machine (valued at $110.00 AUD) + your choice of $315.00 AUD of Stampin' Up! products for only $210.00 AUD.

2.  Grab the original white Mini Machine (valued at $110.00 AUD) + your choice of $315.00 AUD of Stampin' Up! products for $210.00 AUD

3.  Your choice of $315.00 AUD of Stampin Up products for only $169.00 AUD.

That's an extra $80.00 AUD more product than the standard Starter Kit plus a 20% discount every time you place an order! No conditions attached!


JOIN MY TEAM


.


 Product List


Let's Use Vellum - Stampin' Around The World Video Hop

  Welcome and thanks for popping in! Our second Stampin' Around The World Video Hop has kicked off and this month we've been tas...