23 March 2022

Monochromatic Water Colouring - CI#118


Hello crafty friends!  And thanks for popping in!

Welcome back for Colour INKspiration Challenge #118.  The photo for this Challenge was chosen by our amazing Crew member, Bronwyn Eastley and the Guest Designer is the fabulous Kayla McCreadie.   

We also welcome Bernie Roodt as our newest Crew Member.  Looking forward to creating and working with Bernie.  Her designs are amazing!


 Picture credit - https://westcoastgardens.ca/

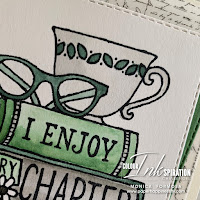
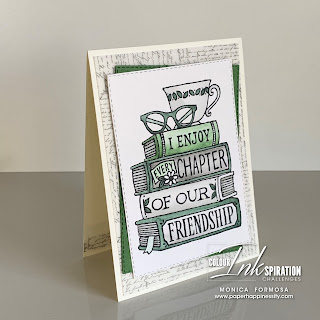
 The card I have made for this Challenge features the Every Chapter stamp set from the Jan-Jun 2022 Mini Catalogue.  I've used the Challenge colours to watercolour the image to produce a monochromatic look. I've also used the Layered Designs Vellum as a backdrop to work in with the book theme.


SUPPLIES NEEDED:

  • Stamp Set:  Every Chapter
  • Dies:  Stitched Retangles
  • Cardstock:  Very Vanilla Thick, Garden Green, Shimmery White,
  • DSP:  Layered Designs 12 x 12 Vellum 
  • Ink:  StazOn Jet Black
  • Ink Refills:  Garden Green, Soft Succulent, Basic Gray
  • Colour Accessories: Wink of Stella
  • Tools:  Water Painters, Paper Trimmer, Stampin' Cut & Emboss Machine
  • Adhesives: Stampin' Seal

HOW TO ASSEMBLE:

  • Create a card base in Very Vanilla Thick cardstock. 
  • Trim a piece a vellum to measures 1/4" smaller on two sides.  This will allow a border of 1/8" all around.
  • Die Cut a rectangle using the Stitched Rectangles dies.
  • Stamp your image on Shimmery White cardstock using StazOn Jet Black ink
  • Add a drop of ink refill in each colour to a larger clear stamping block and colour your image with the small detail Water Painter as follows:
        From the top:
        Cup:  Basic Gray, Soft Succulent
        Glasses:  Soft  Succulent, Basic Gray (glass area) 
        First Book:  Garden Green, Basic Gray
        Second Book: Soft Succulent, Basic Gray
        Third Book:Basic Gray, Soft Succulent 
        Fourth Book:  Soft Succulent, Basic Gray

        TIP:  When watercolouring, colour areas not next to each other as colours run if colouring beside a wet/damp area.
  • Die cut this image with the same Stitched Rectangle that was used for the Garden Green cardstock.
  • Adhere the Vellum to the card front using Stampin' Seal.
  • Adhere both the coloured image and the Garden Green cardstock together, offsetting the rectangles.  Adhere this to the card front keeping the image straight.
  • Add a strip of Vellum to the inside of the card.
  • Add some Wink of Stella to the frame of the glasses.


Feel INKspired to join the challenge? I would love for you to join us! It's a great way to have fun with different colours! 

Firstly, hop on over and check out the creations of the Colour INKspiration Crew in the Challenge album on our Facebook page. Then you have 12 days from today to make and upload your creation to the Facebook Colour INKspiration Group. You don't have to have a blog to participate but if you do, you can link back to your post. Just a reminder to use all the challenge colours. Neutrals such as Whisper White, Very Vanilla, Crumb Cake, Sahara Sand and Basic Black are also allowed as well as Metallics.

If you feel inspired, click here and ask to join Colour INKspiration, add the group to your Favourites and share it with your crafty friends so they can join in the fun too. We can't wait to see what you create with these gorgeous colours! 
 
Thank you so much taking the time to drop in. I hope I have inspired you and if you like what I have shown or if you have any questions, please leave them in the comments section below.  
 
Until next time, take care, stay safe and have a great day!   
Monica xx
.
 
To purchase any of the products I've used today  you can click any of the direct links in the Product List below or click the 'Shop Online' tab at the top of this page.  Both ways will get you directly to my online store, where you are only minutes away from getting products delivered straight to your door.

Or maybe you have a wish list as long as your arm? If so, the best deal in the catalogue is to join my Stamping Queens Stamping Team. Until the end of November, you'll get the $169.00 Starter Kit - filled with your pick of products to the value of $235.00 - for only $130.00 with a 20% discount every time you place an order!
 

                                                 .

  Product List 


 Live In Australia? Shop With Me!


16 March 2022

Black & White with a Pop of Colour feat Layering Designs Vellum


 Hello and thanks for popping in! 
 
For anyone who loves black and white with a pop of colour, this card is for you.  It's a little product heavy but for such a special occasion, it's totally worth it. 
 
This project was made for a very special friend who had a milestone birthday just last week.  My inspiration came from a card I saw in Pinterest made by the lovely Laura Seki from Southridge Studio.  Thank you Laura for sharing your idea and I hope I have done justice to your project. You can see her card here.


Originally I just wanted to make a top-fold card but after creating the card topper, I decided to make a simple easel card that could display the card front.  It features the Artistic Dies and the Stitched So Sweetly Dies and for the greeting, I've used Biggest Wish Stamp Set.  For the background behind the topper, I grabbed the Layering Designs Vellum from the Jan - Jun 2022 Mini Catalogue which I felt paired nicely with the overall design.
 
Products Needed:
  • Stamp Set:  Biggest Wishes
  • Dies: Artistic Dies, Stitched So Sweetly Dies
  • Cardstock: Basic White Thick, Basic White Regular, Basic Black
  • Vellum: Layering Designs Vellum
  • Inks: Memento Tuxedo Black, Magenta Madness
  • Embellishments: 2021-23 In Colour Jewels
  • Ribbon: Polished Pink Open Weave Ribbon
  • Tools: Paper Trimmer, Stampin' Cut & Emboss Machine
  • Adhesives:  Tombow Multipurpose Glue, Dimensionals, Mini Dimensionals
How to Assemble:
  • For this project start with a card base in Basic White Thick, trim and scored to create a top-fold, with a portrait aspect.  The card front also needs to be scored in half.  This will form an easel. 
  • You will also need a piece of Basic White cardstock measuring the same size as the card front, a piece of Basic White regular large enough for the scalloped rectangle die cut on the front and another piece for the die cut on the base and a scrap for the stamped 'happy' sentiment.
  •  A piece of Basic Black cardstock measuring 3 1/8" x 4 1/4" for the mat layer on the front, a piece large enough for the scalloped rectangle for the base, a piece large enough to die cut the detailed flowers and leaves.
  • Lastly, a piece of vellum from the Layering Designs Vellum measuring 1/8" less on two sides to give you a narrow 1/16" border all round.
  • Die cut the detailed pieces from Artistic Dies and set aside.
  • Die cut the largest scalloped rectangle in Basic White and adhere this to the Basic Black mat layer. Adhere the detailed floral die to the top of this.
  • Attach a small piece of Magenta Madness ribbon to the bottom corner.  Add Dimensionals to the back and attach this to the piece of Vellum.
  • Apply Seal Adhesive to the Vellum only in the area covered by the topper and attach this to the piece of Basic White cardstock that's the same size as the card front. 
  • Using adhesive of your choice, glue down the card front to the bottom half of the front of the card base.
  • Die cut a piece of Basic Black cardstock using the largest scalloped rectangle from Stitched So Sweetly Dies. Glue this onto the base of the card.
  • Stamp the lower case 'happy' from Biggest Wishes in Memento Tuxedo Black ink and fussy cut.
  • Stamp the upper case 'BIRTHDAY' from the same stamp set and die cut again using the Stitched So Sweetly dies.
  • Trim a few leaves from the detailed leaf die cut and add these under the bottom edge of the 'BIRTHDAY' label.  Glue this to the base.
  • Attach Mini Dimensionals to the 'happy' and attach this above the 'BIRTHDAY'. This will help form the stay for the easel mechanism.
  • Add a large Magenta Jewell across from the top of the 'h'.  This will help keep the easel straight.  Add a few more jewels lower down.
  • Add a few Jewels to the centre of the large flower on the front. 


 Thank you so much taking the time to drop in. I hope I have inspired you and if you like what I have shown or if you have any questions, please leave them in the comments section below.  

 
Take care, stay safe and have a great day! 
 
Monica xx
To purchase any of the products I've used today, you can click any of the direct links in the table above or click the 'Shop Online' tab at the top of this page.  Both ways will get you directly to my online store, where you are only minutes away from getting products delivered straight to your door.

Or maybe you have a wish list as long as your arm? The best deal in the catalogue is to join my Stamping Queens Stamping Team. For $169.00 you get to choose $235.00 of products with a 20% discount every time you place an order!
 

.

Product List 


.

 Live In Australia? Shop With Me!


Stamp Your Own Designer Paper - Colour INKspiration Challenge #163

Hello and welcome!  Today I am sharing a stamped project that I've created for Colour INKspiration Challenge #163. The inspiration photo...