


Hello my stampin' friends! Welcome and thanks for popping in.
This Colour INKspiration Challenge marks a significant milestone for our Crew. We are 150 Challenges Old! and to celebrate we have a special inspirational photo for you which was chosen by our fabulous Crew Leader, Lou Kitzelman. The Guest Designer is the amazing Donna Hardcastle and I can't wait to go and see what everyone has created.
We have been given some lovely bright colours to create with for this Challenge, very summery and almost bordering on autumnal.
 |
| Picture credit - https://www.pinterest.com.au/pin/135882113751928038/ |
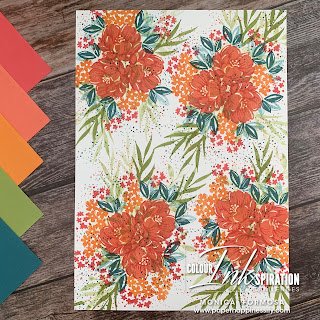
Supplies:
- Cardstock: Basic White
- Inks: Sweet Sorbet, Calypso Coral, Pumpkin Pie, Old Olive, Pretty Peacock
- Stamp Sets: Gorgeously Made, Two-Tone Flora, Sending Smiles, Layering Leaves
- Tools: Stampin' Piece Mat, Blending Brushes


Feel INKspired to join the challenge? I would love for you to join
us! It's a great way to have fun with different colours!
If you'd like to join in with our Challenges, click here and ask to join Colour
INKspiration, add the group to your Favourites
and share it with your crafty friends so they can join in the fun too. We'd
love to see what you create with these gorgeous colours! You don't have to have
a Blog to participate but if you do, you can link back to your post.
Just a reminder to use all the Challenge colours. If you
don’t have the colours in our palette, feel free to use the closest Stampin’
Up! substitute - Melon Mambo instead of Berry Burst for example. We also
allow Ivory, Bronze and Natural Tones in the Stampin' Blends and Neutrals such
as Basic White, Very Vanilla, Crumb Cake, Basic Black and Metallics.
Thank you so much taking the time to drop in. I hope I have
inspired you and if you like what I have shown or if you have any questions,
please leave them in the comments section below.
Until next time, take care, stay safe and have a great
day!
Monica xx
.
If you live in Australia and would like to purchase any of the products
I have used today, click any of the thumbnail links in the Product List below
or click the 'Shop Online' tab at the top of this page. Both ways will
take you directly to my Stampin' Up! Store, where you are only minutes away
from getting your supplies delivered straight to your door.
Or maybe you have a wish list as long as your arm? If so, the best
deal in the Catalogue is to join my Stamping Queens Stamping Team.
You can put together a Starter Kit with your choice of products to the
value of $235.00 for only $169.00 with a 20% discount every time you place an
order! No conditions attached! And who knows where you're Stampin' Up!
journey will take you.
Happy to chat if you have any questions about becoming a Demonstrator.

- Product List -
")

")
")


No comments:
Post a Comment
Thanks for taking the time to comment - it is really appreciated!