

Hello friends and welcome! Thanks for popping in!
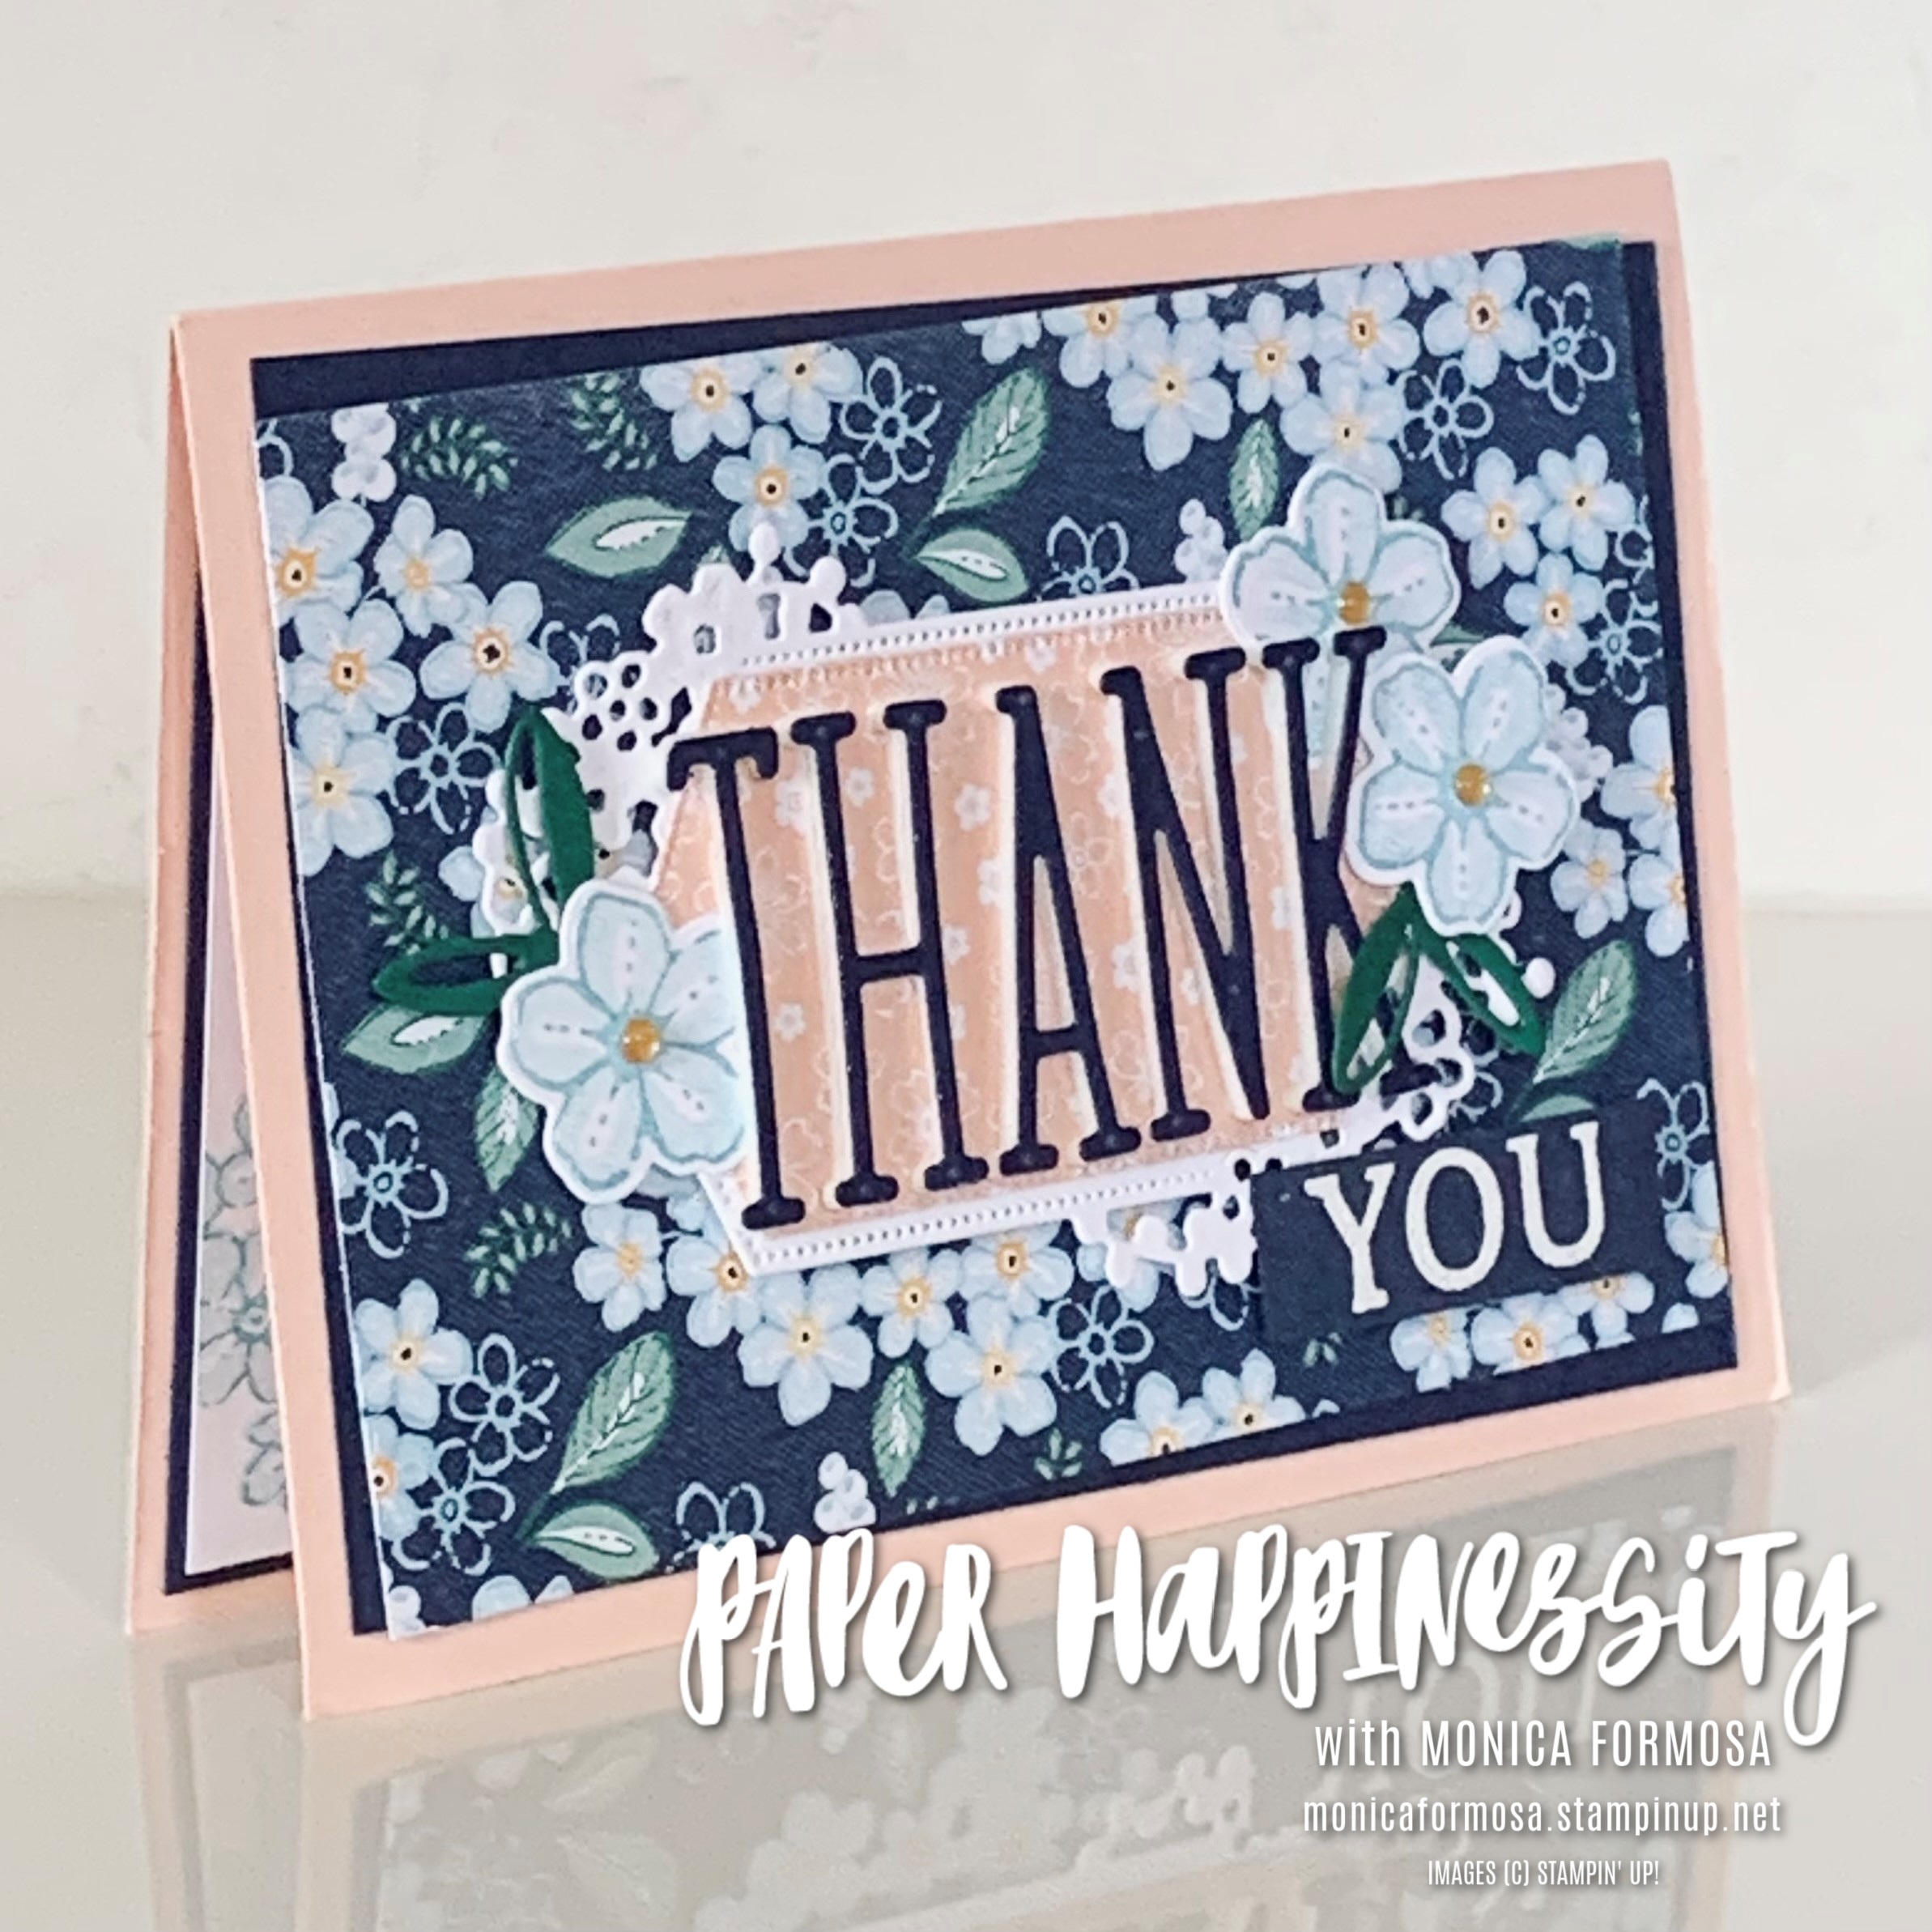
It's the start of a new month and today I'm sharing the card that I have put together for my customer and team Thank You's. It features the Sentimental Park Bundle and co-ordinating Regency Park papers. I've teamed those products with the lovely Alphabet A La Mode and stamped and white embossed the second part of the sentiment.

This has also been shared over on Kylie Bertucci's Blog so please head over and put in a vote for me. Your vote will help me get a spot in the Top 10 and the chance to participate in Kylie's International Blog Hop.

Supplies:
- Bundle: Sentimental Park
- Dies: Alphabet A La Mode
- Papers: Regency Park
- Cardstock: Petal Pink, Night of Navy, Shaded Spruce, Basic White
- Ink: Versamark, Balmy Blue
- Accessories: Basics Embossing Powders (white)
- Embellishments: Adhesive Backed Milky Dots
- Tools: Paper Trimmer, Heat Tool, Mini Stampin' Cut & Emboss Machine
- Adhesives: Foam Adhesive Sheets, Dimensionals, Tombow Multipurpose Glue
- Die cut a large floral label in Basic White and a smaller label in a co-ordinating paper and glue together.
- Stamp the large flowers in first generation Balmy Blue ink for the details and second generation for the fill and die-cut using the co-ordinating dies.
- The flower on the left and top right is glued directly to the label. The flower on the bottom right is attached with a Dimensional. Add small Mango Melody Mikly Dots to the centres of each flower.
- Die-cut two of the upper stem in Shaded Spruce and trim to create leaves and add these under the flowers, one each side.
- Attach a piece of Night of Navy cardstock large enough for the work 'Thank' to a piece of Foam Adhesive Sheet and die-cut the word and attach the letters to the label.
- Create a card base in Petal Pink cardstock.
- Trim a piece of Night of Navy cardstock and a piece of co-ordinating Designer Paper measuring 1/2cm or 1/8" smaller on two side than the card front. Glue these together off-setting to create jaunty angles and then glue these to the card front.
- Attach the label to the card front with Dimensionals.
- Stamp the word 'YOU' on a strip of Night of Navy cardstock in Versamark and heat emboss in white.
- Add this under the label with Dimensionals.
- Stamp the cluster of flowers in first generation Balmy Blue for the outline and second generation for the fill on a piece of Basic White cardstock that's been trimmed 1 cm or 1/4" smaller that the card front.
- Add a Night of Navy mat trimmed to measure 1/2cm or 1/8" larger that the piece of Basic White and glue this to the inside.

Thank you so much taking the time to drop in. I hope I have inspired you and if you like what I have shown or if you have any questions, please leave them in the comments section below.
Until next time, take care, stay safe and have a great day!
Monica xx
.
To purchase any of the products I've
used today, you can click any of the thumbnail links in the Product List below
or click the 'Shop Online' tab at the top of this page. Both ways will
get you directly to my Online Store, where you are only minutes away from
getting products delivered straight to your door.
Or maybe you have a wish list as long
as your arm? If so, the best deal in the catalogue is to join my Stamping
Queens Stamping Team.
You can put
together a Starter Kit with your choice of products to the value of $235.00 for
only $169.00 with a 20% discount every time you place an order! No conditions
attached! The added bonus is that you might like to start your own
little stamping business.

")

 Designer Series Paper")


Beautiful card Monica. Thanks for being part of my International Blog Highlights this month and all the best with voting!
ReplyDeleteThank you Kylie. Thank you so much for the invitation. x
DeleteGorgeous paper and colours!
ReplyDeleteThanks Rebecca! These were lovely products to work with.
DeleteLovely card! I really enjoy this color combination.
ReplyDeleteThanks so much Teah! It was hard to narrow it down with these gorgeous papers.
DeleteBeautiful card!
ReplyDeleteThanks Rachel x
DeletePretty card! Love the way you highlighted the word thank. Good luck with the voting.
ReplyDeleteThanks so much Robbie x
DeleteGreat use of the Alphabet a la Mode dies on Foam Adhesive Sheets.
ReplyDeleteThanks Kelly. I need to remind myself to use the foam adhesive sheets more often. x
DeleteI love your card - it's so fresh and spring like and I really love how you used the alphabet!
ReplyDeleteThank you Alison x
DeleteI really like your card, Monica! Great idea to use the Foam Adhesive Sheets to pop up the letters!
ReplyDeleteThank you Kim. The foam adhesive sheets give lots of added dimension - I just need to remind myself to use it more often. x
DeleteLovely card! Great idea to highlight the word thank.
ReplyDeleteThank you Liane x
DeleteBeautiful card
ReplyDeleteThank you x
DeleteThank you Katja x
ReplyDelete